
Digging out a basement under an existing house adds a whole floor without touching the roofline. It is also the most engineering-heavy home project most people commission: you are removing the ground your walls, and often your neighbours’ walls, stand on.
The work succeeds or fails on order. This guide walks through the nine steps of a basement excavation in England, how long each phase takes, and the risks to plan for.
How a basement dig-out works, and how long it takes
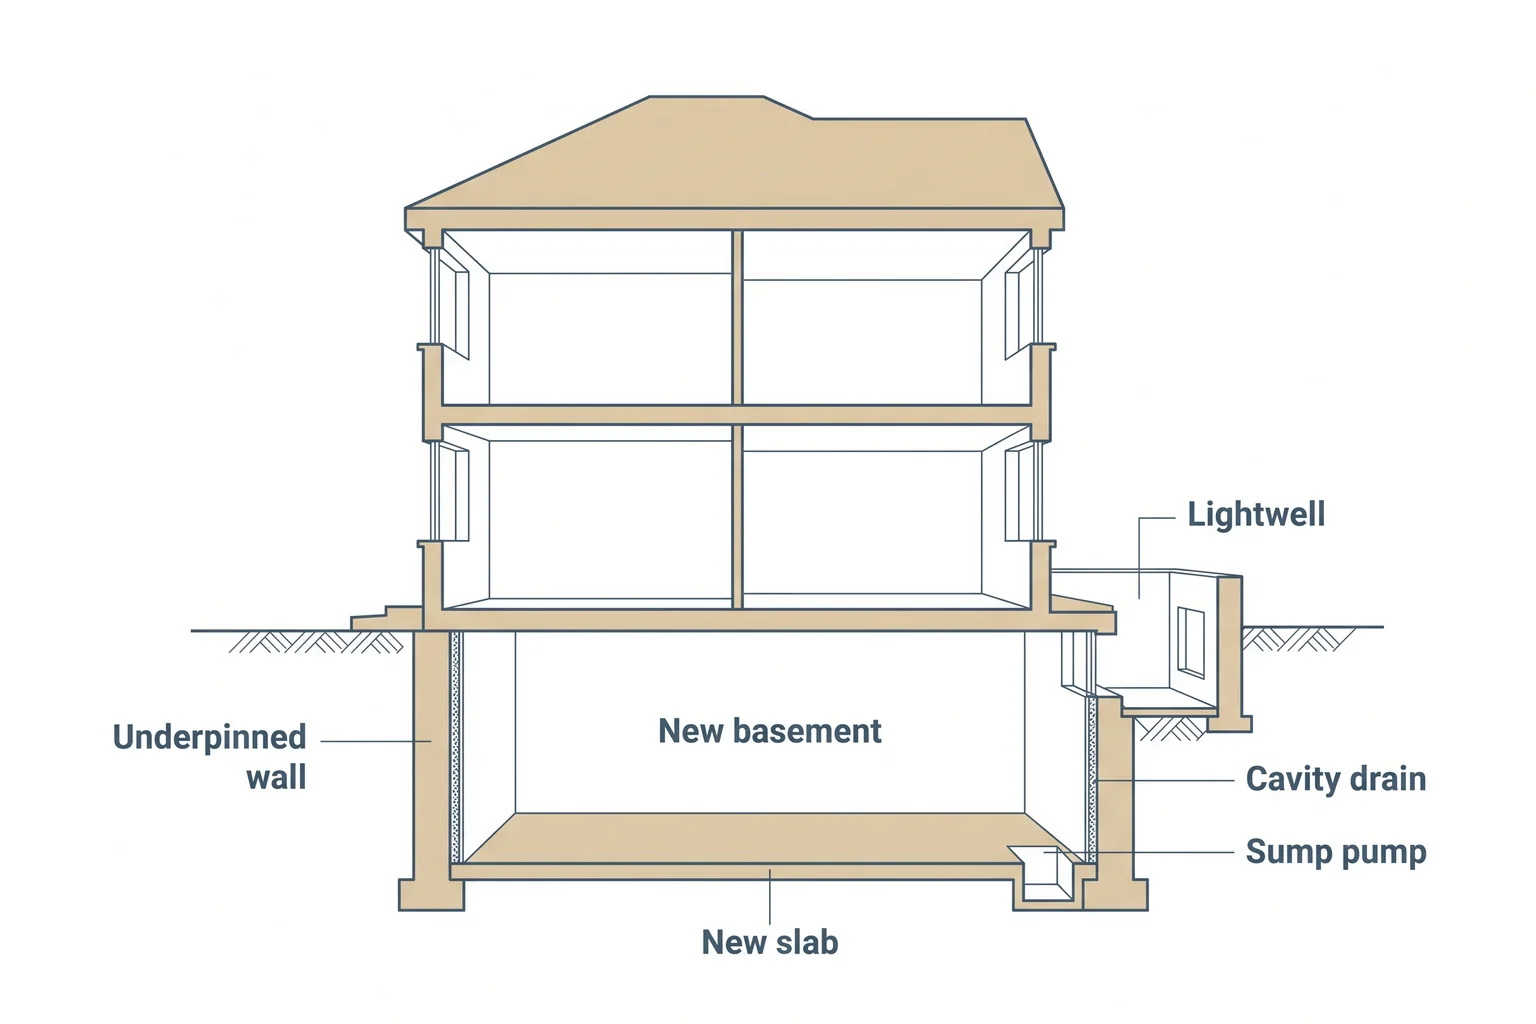
Digging out a basement means underpinning the existing walls in short sections, excavating the ground beneath the house, then waterproofing the new structure and casting a new floor slab. Expect 4–6 months of design, planning and party wall lead-in, then 16–40 weeks on site depending on scope, according to BestBuilders’ 2026 basement conversion guide (checked October 2026).
Steps 1 to 6 below happen on paper and decide the cost, the programme and the risk. Steps 7 to 9 are the build itself.
| Scope of work | Typical time on site |
|---|---|
| Cellar conversion, no dig | 8–12 weeks |
| Cellar conversion with a lightwell | 12–16 weeks |
| Lowering an existing cellar floor | 16–22 weeks |
| New basement under the house footprint | 28–40 weeks |
Bookabuilder’s 2026 guide gives a similar picture: 2–3 months for a simple cellar and 4–6 months for a full excavation with underpinning. Treat any single figure as a starting point for your own programme.
Step 1: Test feasibility with a measured survey
Start by establishing exactly what you have. A measured building survey records existing floor levels, wall thicknesses, ceiling heights and any existing cellar, so every later decision rests on real dimensions rather than estate agent plans.
Feasibility then answers three questions:
- Is there an existing cellar? Victorian and Edwardian terraces in Brighton, Hove, Worthing, Eastbourne and other Sussex towns often have one, and lowering an existing cellar floor is a smaller job than digging from scratch.
- How much headroom can you gain? The depth of your footings and your neighbours’ foundations limits how far you can go before underpinning becomes extensive.
- What does the site allow? Access for removing spoil, space for a lightwell, drains and services under the floor, and any listed building or conservation area status.
Step 2: Appoint a structural engineer and investigate the ground
A structural engineer designs everything that holds the house up during and after the dig: the underpinning, retaining walls, the new slab and any steel beams. Appoint one early, because their findings decide whether the scheme is buildable at a sensible cost.
The engineer will usually recommend a site investigation, such as trial pits or boreholes, to establish:
- the soil type and how it behaves when excavated
- the depth and condition of existing foundations, yours and your neighbours’
- the groundwater level and whether it changes through the year
- the route of buried drains and services
On coastal and low-lying sites, where water tables can be high, the groundwater level often shapes the waterproofing and slab design as much as the floor plan does.
Step 3: Design the basement in 3D
Design turns the survey and the engineer’s findings into a layout that works below ground. In a basement the hard constraints are headroom, daylight, ventilation and a way out in a fire, and all four have to be resolved together.
- Headroom. Building regulations set no minimum ceiling height for a habitable room in England. As practical guidance rather than law, around 2.1 metres is a common minimum and 2.3–2.4 metres feels comfortable. Stairs generally need 2 metres of headroom over them.
- Escape. Under paragraph 2.16 of Approved Document B, Volume 1, a basement with habitable rooms needs an emergency escape window or external door, or a protected stairway leading to a final exit.
- Light. An escape window usually needs a lightwell to escape into, which is why the fire strategy and the planning application are linked.
- Waterproofing grade. Habitable space falls under Grade 3 of BS 8102:2022: no water penetration, with ventilation or dehumidification suited to the use.
Working in 3D exposes headroom pinch points, stair positions and lightwell depths before anyone commits to them. At ArchEvolve, a measured survey and a 3D model of the scheme show the usable headroom before you commit to the dig, which is the starting point of good basement conversion design.
Step 4: Secure planning permission
In England, excavating to create a new basement is likely to require planning permission “due to the major works which are required”, according to the Planning Portal’s basement guidance. Converting an existing basement into living space usually does not, but adding a lightwell or altering the external appearance is likely to.
Three things shape the application:
- Front lightwells. A lightwell visible from the street may face stricter rules on appearance.
- Local basement policies. Councils may set their own rules in supplementary planning documents, which can affect the depth and size of a basement. Some London boroughs, for example, limit how much of a garden a basement can occupy.
- Designations. Listed buildings need listed building consent for internal as well as external work, and conservation areas and Article 4 directions can restrict changes.
Where the position is unclear, such as lowering an existing cellar floor with no external changes, ask the council for pre-application advice or apply for a Lawful Development Certificate. Our guide to planning permission for basement conversions covers each scenario in more detail.
Step 5: Serve party wall notices
If you share a wall with a neighbour or dig close to their foundations, the Party Wall etc. Act 1996 applies. The government’s explanatory booklet on the Act sets out when section 6 requires notice: excavation within 3 metres of a neighbouring building that goes deeper than its foundations, or within 6 metres where the dig would cut a line drawn down at 45 degrees from them.
- Serve excavation notices at least one month before work starts, with plans and sections showing the dig.
- If a neighbour does not consent in writing within 14 days, a dispute is deemed to have arisen, and surveyors are appointed to agree a party wall award.
- Underpinning the party wall itself needs a separate section 2 notice.
In a terraced or semi-detached house, a dig-out can affect neighbours on both sides, so build the notice period and any award into the programme.
Step 6: Get building regulations approval and tender the work
Converting a basement into living space needs building regulations approval, covering fire escape routes, ventilation, ceiling height, damp proofing, electrical wiring and water supplies, according to the Planning Portal’s building regulations guidance. For a dig-out, the full plans route is the sensible one, because the drawings and the engineer’s calculations are checked before work starts.
The building regulations drawings need to cover structure (Part A), fire escape (Part B), moisture and radon protection (Part C), ventilation (Part F), drainage (Part H), stairs (Part K), insulation (Part L) and electrics (Part P). Below-ground WCs and showers often need a pump because they sit below the sewer. Our building regulations checklist for basement conversions goes through each Part.
Tender from the same drawing set, so every contractor prices identical details and the quotes are comparable. Ask each one who designs the temporary works, how spoil will leave the site and who will service the pumps.
Step 7: Excavate and underpin in sequence
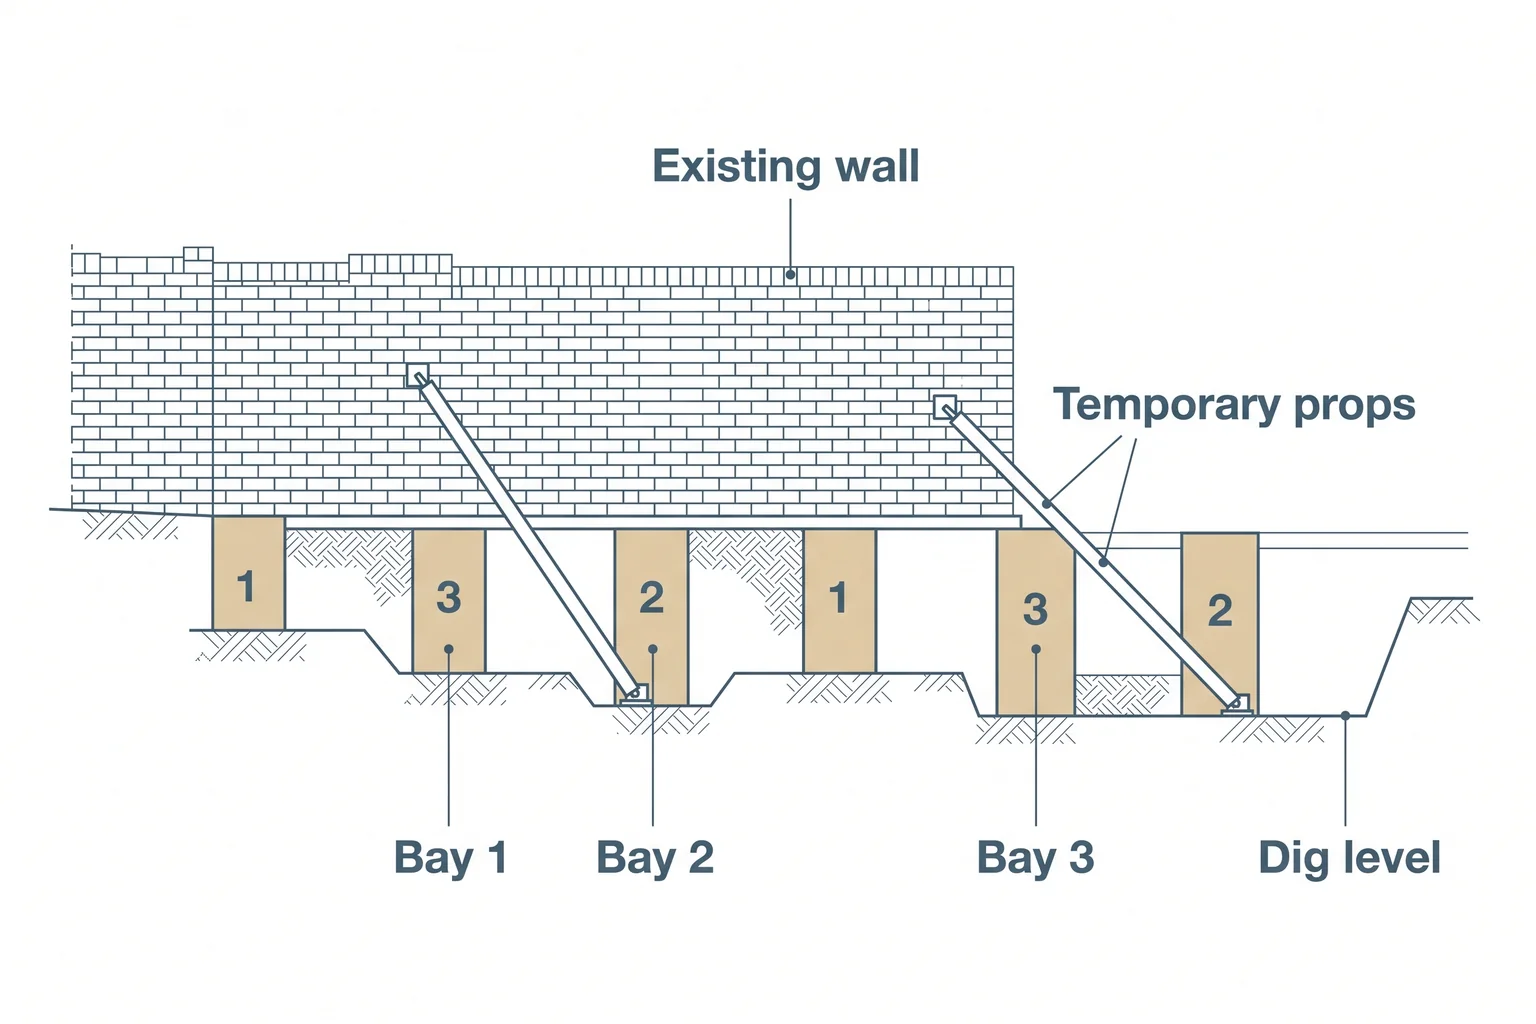
Underpinning extends the existing foundations down to the new basement level, so the walls stay supported once the ground beneath them is removed. Your structural engineer specifies the method and sequence, and the contractor’s temporary works hold everything steady while it happens.
A typical sequence runs like this:
- Install the temporary works, such as props and any shoring the engineer specifies.
- Dig a first set of short underpinning bays beneath the wall, leaving the ground between them in place.
- Cast concrete in those bays and let it gain strength before moving on.
- Dig and cast the remaining bays in the specified order, so the wall is never undermined along a long length.
- Excavate the central area once the perimeter is supported, removing spoil as the dig progresses.
The order the bays are dug in is a structural design decision, not a site preference, so do not let anyone shortcut it to save time.
Record the condition of adjoining walls before work starts, so any movement can be measured. Building control inspects at key stages.
Step 8: Install waterproofing and the new slab
Once the excavation is complete, the structure is waterproofed and the new floor slab is cast. BS 8102:2022 describes three types of protection, and the designer chooses one or a combination based on the water table, the ground and the end use.
- Type A, barrier protection: membranes or coatings applied to the structure, often called tanking.
- Type B, structurally integral protection: water-resisting concrete.
- Type C, drained protection: a cavity drain membrane with perimeter drainage and a sump pump.
The standard recommends considering combined systems where the risk is high, and involving a waterproofing design specialist early. Type C systems rely on pumps, so plan for servicing and battery backup.
The new slab also carries insulation to meet Part L and, in radon-affected areas, radon protection under Part C. Our guide to basement waterproofing systems explains how designers choose between them.
Step 9: Fit out and get the completion certificate
Fit-out turns the shell into rooms: services, ventilation, plastering, the stair, flooring and the lightwell glazing. Make sure every trade knows where the waterproofing sits, so nothing is fixed through it without the correct sealing detail, and keep access to any sump open.
At the end, building control, either the local authority or a registered building control approver, carries out a final inspection and issues a completion certificate. File it with the party wall award, the waterproofing details and the pump servicing schedule, because buyers’ solicitors and lenders will ask for them.
Risks to plan for, and how to manage them
Most dig-out problems trace back to something nobody knew when the price was agreed. Bookabuilder’s 2026 guide notes that overruns commonly add 10–30% to initial budgets, so gather the information before you sign.
| Risk | How to manage it |
|---|---|
| Groundwater higher than expected | Site investigation before design; waterproofing specialist involved from the start |
| Movement in your walls or your neighbours’ | Engineer-designed underpinning sequence, temporary works, condition records and a party wall award |
| Hidden drains and services | Trial pits and a drainage survey; drainage designed into the building regulations drawings |
| Programme slip before work starts | Allow 4–6 months of lead-in (BestBuilders) and serve party wall notices early |
| Pump failure after handover | Battery backup, an alarm and a servicing schedule for any Type C system |
| Budget overrun | Comparable tenders from full plans drawings and a realistic contingency |
Frequently asked questions
Can you dig a basement under an existing house?
How deep can you dig a basement under a house?
Do I need my neighbours’ agreement to dig a basement?
Does a basement dig-out need a lightwell?
Is lowering a cellar floor cheaper than digging a new basement?
Who do you need on the team for a basement excavation?
How ArchEvolve can help with your basement dig-out
Most decisions that make a basement dig-out safe and affordable are made before a contractor arrives. ArchEvolve, run by Alex Page MCIAT, a Chartered Architectural Technologist, handles that design stage: measured survey, 3D model, planning and building regulations drawings, and coordination of the structural engineer and other specialists.
ArchEvolve designs and draws; your chosen specialist contractor carries out the excavation, underpinning and waterproofing. See how our basement conversion service works for homeowners across West Sussex, East Sussex and Surrey, and for developers UK-wide.